Creating Chrome Extensions with React
If you’re into client-side web development to any extent, you’ve probably heard of Facebook’s React library (or maybe you’ve just been living under a rock). Recently, I was working on a Chrome extension, and decided to see how well React fit in to the development I was doing. (Spoiler alert: it fit in quite well.) This post is not meant to be a React tutorial in any way, but rather a brief overview of some of React’s core concepts and some of the things I learned while building the application.
The Extension
For reference, the extension I built with React is called Fast Tab Switcher, which I made for people who, like myself, don’t seem to know how to close browser tabs, and subsequently can’t find the one they’re looking for. The extension allows users to hit a keystroke and pop open a window that shows all their currently open tabs; users can then filter the tabs with a text box, and press enter to switch to the currently selected entry. All the code is available on GitHub, and the extension can also be installed from the Chrome Web Store.
Note: If a lot of time has passed since I wrote this post and the code has changed, you can always get to the original code at the v1.0.1 tag. All the links to source files will point to this tag.
I chose to use Browserify (and Reactify, for the JSX transformation) to build this application, which allows us to build code using Node.js style requires and module.exports…s. It’s not required for building this kind of app, but having access to Node packages and tooling is a nice win. Check out the build scripts I used to build the Browserified bundles (build.sh builds one time then exits, watch.sh watches for changes in the source files and compiles continuously).
React’s Big Idea
If you’re not familiar with React, it’s a JavaScript library for creating UIs based on reactive data flow. The basic idea is to create components made up of idempotent rendering functions that always represent the UI for that component at any given time. When there’s a state change in your component, React calls your rendering function again and builds an in-memory representation of your UI, and compares this to the last in-memory representation to figure out what pieces of the actual DOM should be updated.
I’m seriously glossing over details here, so be sure to check out the React web site and some of their awesome videos to learn more. Of particular note is “Rethinking Best Practices” from JSConf.Asia 2013.
If this whole thing sounds like a terrible idea to you, I urge you to give it a shot anyway—the proof of the pudding is, as they say, in the eating. I unfortunately (and somewhat ironically) dismissed it pretty quickly when I first heard about it, but now I wish I had given it a closer look sooner.
JSX
One of React’s more unique features is called JSX—it is, quite simply, an XML-like syntax that React transforms into JavaScript.
The idea is to be able to express your views with something that looks like HTML instead of a bunch of JavaScript function calls. A lot of people seem to dislike JSX; I’ve grown rather fond of it. That said, it’s completely optional; while I use it in the extension, it’s one of the least important pieces of React, and you shouldn’t let it trip you up.
Learning React
From this point on, I’ll be assuming you know at least a tiny bit about how to use React; in particular, we’ll mention parts of a component’s lifecycle a couple times, and discuss state and properties. If you get totally lost reading this post, or want to brush up on React before we begin, check out the resources above and the React tutorial and then come back. We’ll be waiting.
Anatomy of an Extension
Just kidding, we’re not really waiting on them. They’ll catch up.
Chrome allows extensions to run code in a couple different contexts; one, called a background page (or an event page, depending on how you use it), allows you to run code in the background. Most often, this can simply be a script, instead of a full on HTML document. The source for ours is in src/js/background.js.
The event page in our extension is basically responsible for two things: opening the tab switcher when the user presses the extension’s keyboard shortcut, and responding to messages sent from the client (one for querying the list of currently open tabs and one for asking the extension to switch to a given tab). Since we’re focusing on React in this post, we’ll gloss over the details; check out the source if you’re curious!
The Client
build/html/switcher.html is the HTML document that serves as the front-end for our extension. It contains nothing but some styles, a few script tags to load some vendored libraries and our app, and a single empty div element with an ID.
When the page loads, it runs our Browserified client bundle, the entry point of which is src/js/client.jsx. It’s quite simple:
All of our React components are exported via module.exports so we can require them for use in any parent components. Here, we’re simply asking React to render a top-level TabSwitcher component, attaching it to our div.
The TabSwitcher
This is where it really gets interesting. Here’s what the TabSwitcher component looks like. I’ve left out a lot of the internals so we can focus on a high-level overview; see the full source on GitHub.
When the component boots, it runs getInitialState to—you guessed it!—get its initial state. We can then refer to this state throughout the component via this.state and modify it via this.setState. componentDidMount runs after the component is mounted to the DOM; refreshTabs() fills in pieces of the state with data from the server—er, from the extension’s event page—by making an asynchronous request and then calling setState with the results. Data is not “pushed” into the extension in any way; refreshTabs is called any time we need to get an updated list of tabs.
Note: For all practical purposes, the phrases “data from the server” and “data from the extension’s event page” are interchangeable. We’re communicating with an extension via a special Chrome API, but the design would be sound if we were communicating over HTTP, websockets, etc.
An important consideration in this design is that TabSwitcher is the only component in the hierarchy that contains any mutable state or any this.setState calls. Similarly, it contains no logic on how to render the UI; it delegates to a few sub-components for that.
The data each sub-component needs to display itself is passed to it through its properties—specifically, the filter, tabs, selectedTab, and searchAllWindows properties.
These properties are immutable; if a child component needs to change the application’s state due to user interaction, it uses the functions that are also passed in via its properties. This allows us to keep all the state changing logic in one place, while using the sub-components’ properties as a form of inversion of control. These passed-in methods, all of which exist on TabSwitcher, appropriately modify the application state and then React re-renders the entire component tree in memory, using intelligent diffing to only modify the browser’s DOM in places that actually need changing.
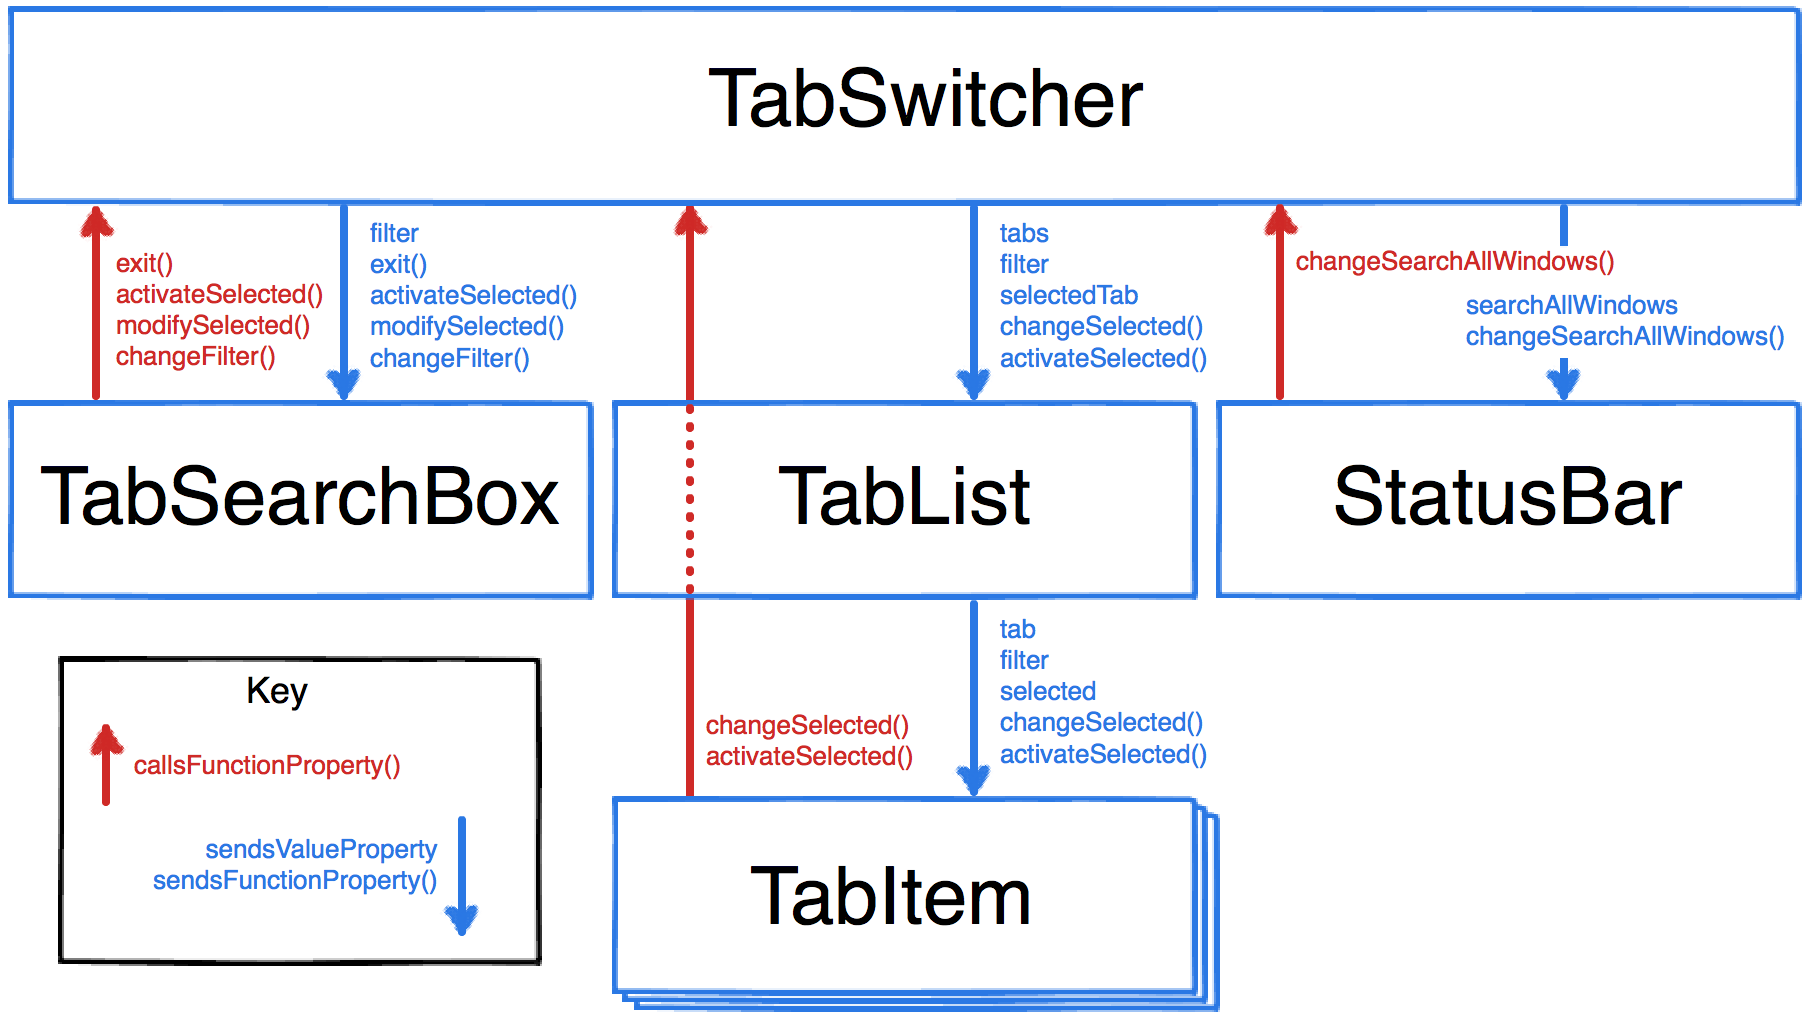
Data only flows from top to bottom. Only TabSwitcher contains any mutable state. Child components are passed functions they can call if they need the applications state to be modified.
Let’s Take a Closer Look
Let’s look at the data flow a bit more closely. As an example, let’s look at what happens when the user types something in the input box, indicating their desire to filter the list of tabs to ones that match their query.
First, in the TabSearchBox component, we have an onChange event listener that fires when the user changes the text.
The change handler calls this.props.changeFilter—that is, the function passed to the component on its changeFilter property—passing in the new string value. It very specifically doesn’t directly modify any state. Also note that we don’t care where the changeFilter function came from or what it does—only that the component’s API specifies that it requires a function on the property named changeFilter that it can call when it wants to change the filter.
The function we passed to TabSearchBox’s changeFilter method was this.changeFilter up in TabSwitcher.
This is where the state change happens; we set the filter to the string that was passed as a parameter, and reset the currently selected item to null.
Changes made to the state via setState trigger an in-memory “render” of the component tree by React, and the new values in the state automatically flow into the child components via their properties. If React detects the actual browser DOM is out of sync with this in-memory model, it then and only then performs the relatively slow DOM manipulation operations necessary to bring it up to date.
If you’re used to a framework with built-in two-way data binding, it can take a while to migrate your mindset to this style of decoupled components. The effort can be worth it, though; relationships between components are explicit and easy to reason about, and keeping all the state changes centralized minimizes the places you need to go digging when there are bugs.
In fact, if you look at the other components in the extension, you’ll notice they’re very short, and do very little; the most complex logic you’ll see is determining how to format a particular string, or which function to call based on which key the user pressed.
Conclusion
I originally wrote this post detailing an evented system I used in this application. @Vjeux tweeted that Facebook previously had a similar event-driven architecture, but found they introduced more bugs using an evented system than they did when they simply passed callbacks around. In addition, when a component can get instantiated in more than one place, you need to find a way to target the specific instances, or use separate buses.
Vjeux: As always, it’s hard to give general advices. But the global bus was a major source of bugs for us. Callback based api isnt :)
I switched out the event bus for property-based function references, and I have to say I do like the explicitness of it quite a bit better. Since I’ve kept all the state changing functions in the top-level component, there’s never a question about where the state is modified, and the explicit properties make it clear at a glance which parts of the API are exposed to child components. Check out the commit that removed the event bus if you’re curious to see what the change looked like.
Have you built anything using React? What patterns did you use? Share it with us in the comments!